5.5.Hack计算机实现
\(5.5.\)Hack计算机实现笔记
1.CPU实现
\(a.\)指令识别
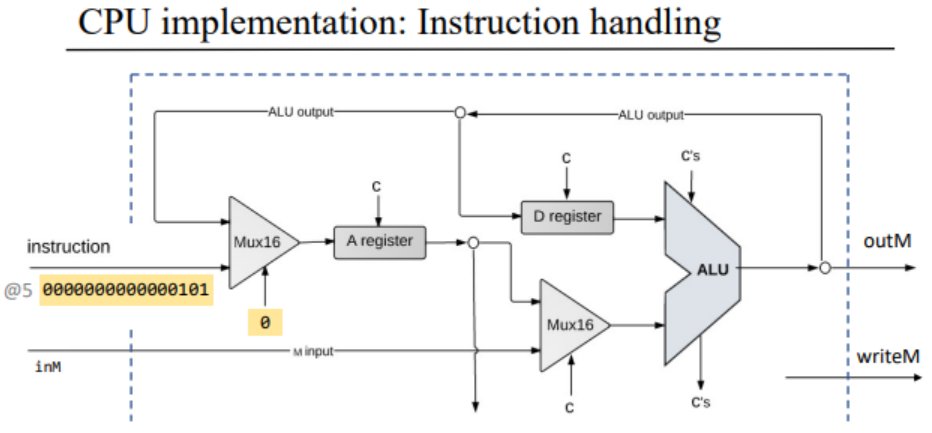
instruction[15]:用于判断是否为A指令。instruction[12]用于选择ALU的第二个输入来源。当instruction[12] = 0时,ALU的第二个输入为A寄存器;否则为存储器的输入数据inM。instruction[6:11]:用于控制ALU的操作。instruction[5]:当instruction[15] = 0时,instruction[5]就是A指令的一部分;否则,它就是C指令的一部分。instruction[4]:用于选择ALU的第二个输入。当instruction[4] = 1时,我们将内存中读取的数据作为ALU的第二个输入(即inM);否则将A寄存器中的数据作为ALU的第二个输入。instruction[3]:用于指示是否要向数据内存写入数据。当instruction[3] = 1时,表示要向数据内存中写入数据(即writeM = 1);否则不对数据内存进行写入操作。C指令对应的16位指令:
1 | 1 c1 c2 c3 c4 c5 c6 d1 d2 d3 j1 j2 j3 |
A指令对应的16位指令
1 | 0 address[14:0] |
\(b.\)A寄存器处理
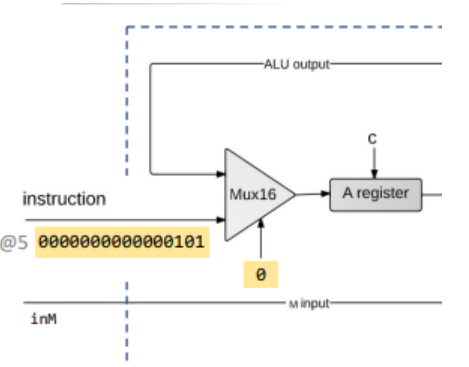
- 输入的16位指令和ALU的输出经过
Mux16作为A寄存器的输入:
1 | Mux16(a = instruction, b = ALUOut, sel = instruction[15], out = Ain); |
- 在后面的过程中,我们需要知道指令是否为
A指令,因此我们用一个pin来记录:
1 | Not(in = instruction[15], out = NotA); |
判断是否需要将指令加载到
A寄存器中。此时有两种情况:- 当前指令不是
A指令,则选择加载。 - 当前指令为
A指令,但是instruction[5] = 1(该位置用于存储A指令有关信息),则选择加载:
- 当前指令不是
1 | Or(a = NotA, b = instruction[5] , out=loadA); |
\(c.\)ALU运算
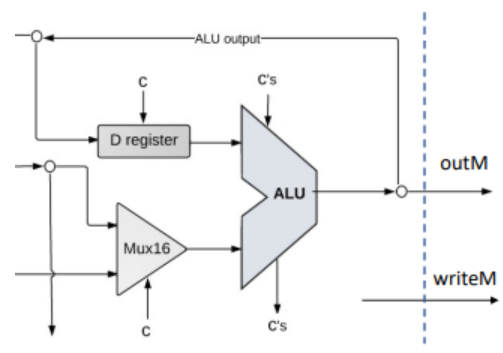
- 我们先处理ALU的两个输入源,其中第二个输入源由
C指令集的instruction[12]控制:
1 | Mux16(a = Aout, b = inM, sel = instruction[12], out = AMout); |
- 然后我们根据先前的指令识别进行ALU运算并输出:
1 | And(a = instruction[11], b = instruction[15], out = zx); |
zy和ny控制信号在A指令时被强制为1是为了确保ALU的输入在处理A指令时被简化与固定,不受C指令控制位的影响,从而避免不必要的计算。
- 之后我们需要执行
C指令集的跳转逻辑。我们根据ALU计算结果和指令中的跳转位来决定是否跳转。
首先对C指令集的跳转位进行明晰:
instruction[0]对应JGT,当ALU输出为正数时跳转。instruction[1]对应JEQ,当ALU输出为0时跳转。instruction[2]对应JLT,当ALU输出为负数时跳转。
于是我们可以写出以下代码:
1 | Or(a = zero, b = nega, out = notpos); |
pos,nega,zero分别代表正数、负数和恰好为0。并且注意除了满足跳转条件外,还需要确保当前是C指令。
- 最后我们调用
PC以存储并更新当前指令的地址:
1 | PC(in = Aout, load = jump, reset = reset, inc = true, out[0..14] = pc); |
2.内存实现
内存实现较为简单,根据传入的15位地址address的后两位以及load来调控RAM、屏幕以及键盘即可。
01 and load: RAMLoad10 and load: SCRLoad11 and load and other digit 0: KEYLoad
3.Hack计算机实现
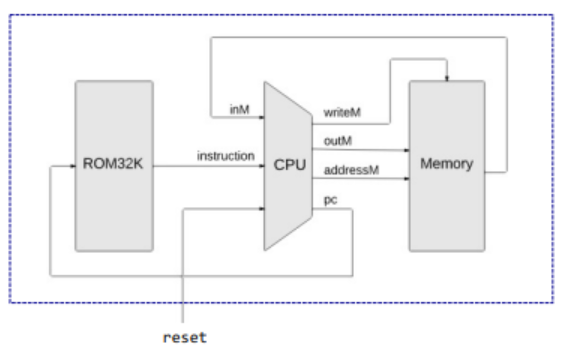
我们根据计算机的结构,对已有芯片进行接线即可:
1 | CPU(inM = MemoryOut, instruction = Rominstruction, reset = reset, outM = CPUoutM, writeM = CPUload, addressM = CPUaddress, pc = CPUpc); |