3.6.Control
\(3.6.\) Control
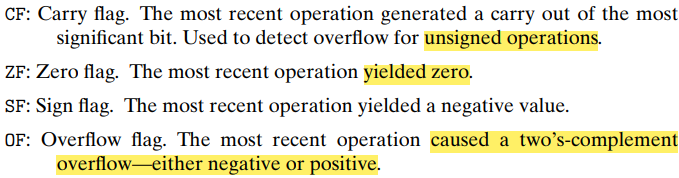
1.Condition Code
In addition to the integer registers, the CPU maintains a set of single-bit condition code registers describing attributes of the most recent arithmetic or logical operation. These registers can then be tested to perform conditional branches
The
leaqinstruction doesn't alter any condition codes, since it is intended to be used in address computations.For the logical operations, such as
xor, the carry and overflow flags are set to zero.For the shift operations, the carry flag is set to the last bit shifted out, while the overflow flag is set to zero.
The
incanddecinstructions set the overflow and zero flags, but they leave the carry flag unchanged.
There are two instruction classes that set condition codes without altering any other registers:
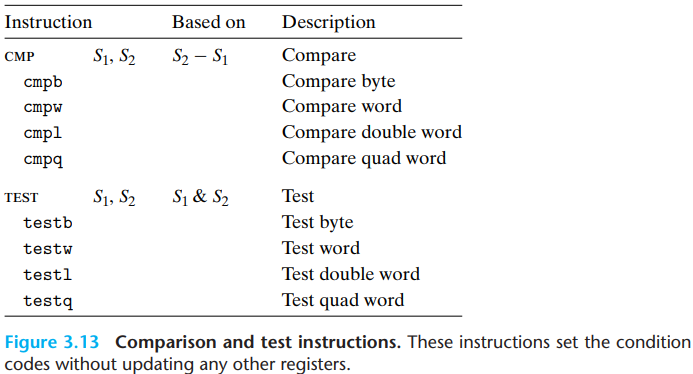
- In
TEST, typically, the same operand is repeated (e.g.,testq %rax,%raxto see whether%raxis negative, zero, or positive), or one of the operands is a mask indicating which bits should be tested.
2.Accessing Condition Codes
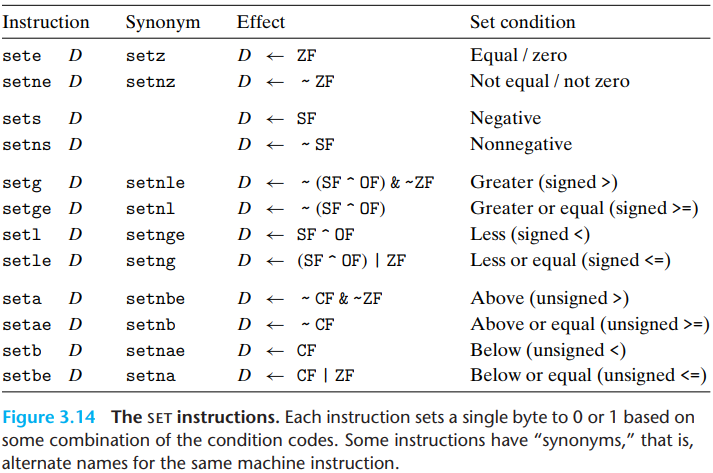
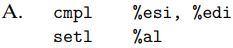
A set instruction has either one of the low-order single-byte register elements or a single-byte memory location as its destination, setting this byte to either 0 or 1.
To generate a 32-bit or 64-bit result, we must also clear the high-order bits. For example:
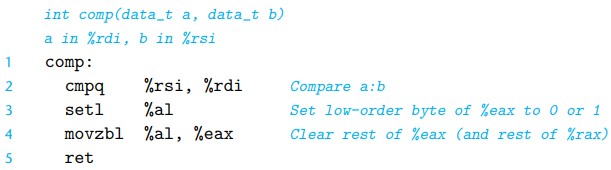
The movzbl not only set the high-order 3 bytes of
%eax to 0, but also set the high-order 4 bytes of
%rax to 0 due to the 32-bit mov
convention.
It is important to understand that assembly code does not keep track of the type of a program value. Instead, the different instructions determine the operand sizes and whether they are signed or unsigned:
\(e.g.\)

3.Jump Instructions
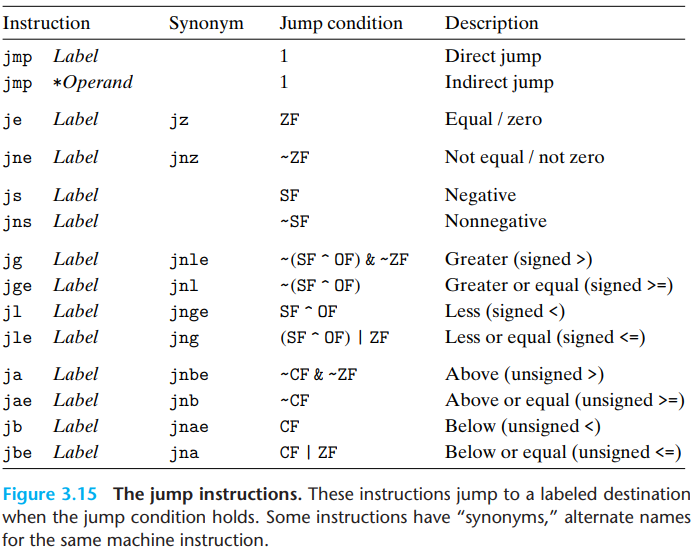
There are two kinds of jump instructions:
Direct jump: It jumps to a label. The jump target is encoded as part of the instructions.
Indirect jump: It is written using
*followed by an operand specifier.jmp *%raxuses the value in%raxas the jump target.jmp *(%rax)reads the jump target from memory, using the value in%raxas the read address.
4.Jump Instruction Encodings
There are several kinds of encoding jump targets:
PC relative. They encode the difference between the address of the target instruction and the address of the instruction immediately following the jump.
A second encoding method is to give an ��absolute�� address, using 4 bytes to directly specify the target.
Let's look at an PC relative example:
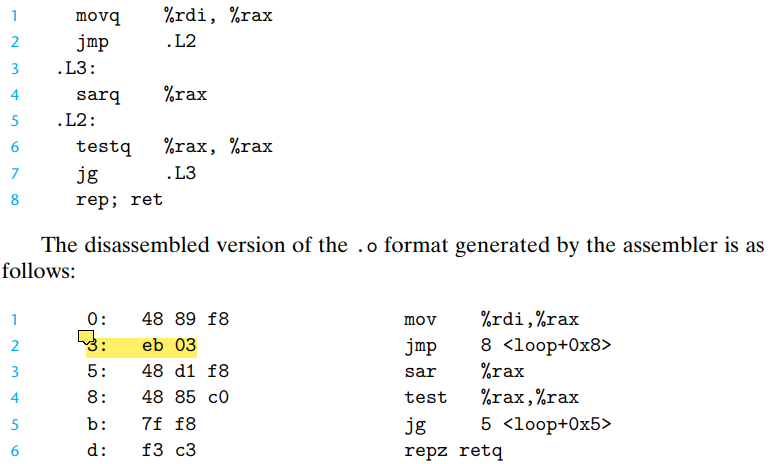
In the annotations on the right, the jump targets are indicated as
0x8 for the jump instruction on line 2, which is equal to
0x5+0x3. This is because the encoding is calculated by
\(the\;address\;of\;next\;instruction+offset\).
In this case, the address of next instruction is 3+2=5, and the
offset is 03, as is shown in the assembly code.
Even though the instructions may be relocated to different addresses, the encoding of the target remain unchanged. This is because the relative position between instructions remains unchanged.
5.Conditional Move
The conventional way to implement conditional operations is through a conditional transfer of control, where the program follows one execution path when a condition holds and another when it does not:
An alternate strategy is through condition transfer of data. This approach computes both outcomes of a conditional operation and then selects one based on whether or not the condition holds:

This strategy makes sense only in restricted cases, but it can then be implemented by a simple conditional move instruction that is better matched to the performance characteristics of modern processors due to the pipelining.
However, due to the preprocess, If one of those two expressions could possibly generate an error condition or a side effect, this could lead to invalid behavior.
The conditional move instructions are as below:
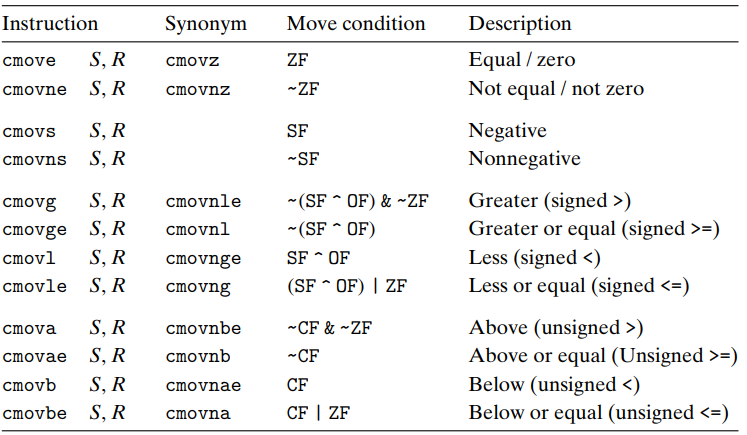
The instructions has two operands: a source register or memory location S, and a destination register R.
The assembler can infer the operand length of a conditional move instruction, so it doesn't need suffix.
6.Loops
\(a.\)do-while
1 | do |
1 | loop: |
\(b.\)while
1 | while (test-expr) |
1 | goto test; |
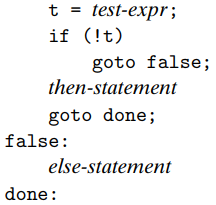
The second translation method is called guarded do, which
uses a do-while style loop:
1 | t = test-expr; |
By this way, we only need to check the condition once before we enter the loop. This reduce the possibility of branch prediction failure.
\(c.\)for
1 | for (init-expr; test-expr; update-expr) |
is equal to the following while statements:
1 | init-expr; |
And there are also two forms of for translation:
1 | init-expr; |
and:
1 | init-expr; |
However, the simple translation from for to
while will be a little tricky. Take the
continue statement as an example:
1 | long sum = 0; |
If we simply use continue, this will lead to an
infinite loop:
1 | long sum = 0; |
The general solution is to replace the continue statement with a goto statement that skips the rest of the loop body and goes directly to the update portion:
1 | long sum = 0; |
7.Switch Statements
The ordinary switch statements looks like this:
1 | void switch_eg(long x, long n, long *dest) |
We can rewrite this using a jump table. A jump table is an array where entry i is the address of a code segment the program should take when the switch index equals i.
With jump table, the previous program will looks like this:
1 | void switch_eg_impl(long x, long n, long *dest) |
The
switchlocations are defined by the labels prefixed by&&.&&is used to create a pointer for a code location.To simplify, the case value is subtracted by 100.
In the assembly code, we use this statement to access the jump table:
1 | jmp *.L4(, %rsi, 8) #Goto *jg[index] |
The base address is
L4, which is the base address of the jump table array.The
(, %rsi, 8)is the index, judging which case to switch to.
In the assembly code, the jump table is indicated by the following declarations:
1 | .section.rodata |
The
rodatarefers to read-only data.L4marks the start of the allocation.
In assembly code, the number of case is judged by
the offset of the label in the jump table.